Automate customer reviews processing with Form Recognizer and Azure OpenAI
In this article, you will build a document processing solution using Form Recognizer, Logic Apps, and Azure OpenAI.
Processing of forms and documents is part of several scenarios both in business and in everyday life. Manual data extraction from documents, either in electronic or printed format, is time-consuming, costly, and error-prone.
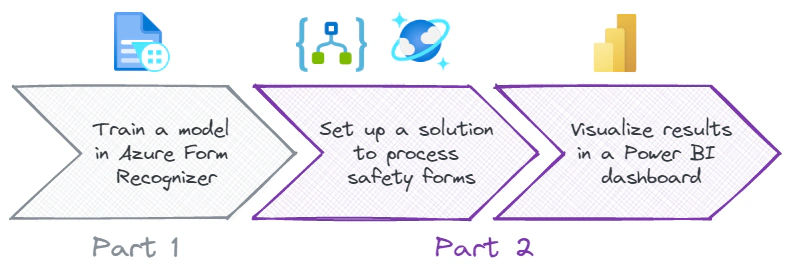
Azure Form Recognizer is an Applied AI Service that enables you to extract text, table data, key-value pairs, and layout information from forms and documents. In this two-part series, you will learn how to build an end-to-end document processing automation solution utilizing Azure Form Recognizer, Logic Apps, Azure Cosmos DB, and Power BI.
In the first part, you trained two custom models for extracting key-value pairs from customer service review forms and composed these models together into a single model. In this article, you will build an automated form processing solution.
You will learn how to:
To build this solution, you will need an Azure subscription. If you don’t have one, you can sign up for an Azure free account.
Consider that you work in a company that provides customer service to a variety of customers. Every day, customers leave reviews about their experiences with the customer service they received. You need to analyze these reviews in order to identify areas of improvement and to track customer satisfaction. These reviews are submitted as paper forms or PDFs and may include up to two different form types. To make this process easier, we need to use a single service to analyze all the reviews.
In the following image, you can see the workflow that we will build to automate the process of extracting and analyzing customer service reviews. In this post, we will focus on the second and third steps of the workflow.
The following architecture diagram illustrates the main components involved in the automated form processing solution that we are building and the information flow. The system receives the forms (either in PDF or scanned image format), extracts the fields from the form and saves the extracted data in Azure Cosmos DB. Power BI is then used to visualize the insights from the data.
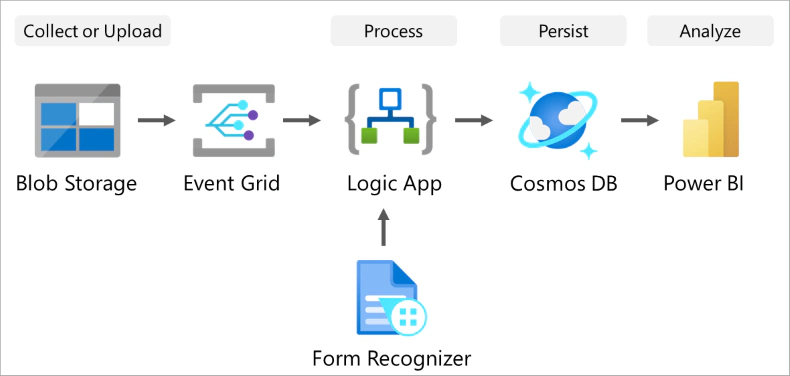
The information flow corresponding to the above architecture diagram is described as follows:
You will create a storage account and a container to upload the forms that will be processed by our Logic App.
Sign in to the Azure portal, search for Storage accounts and then select Create.
Create a storage account with the following settings:
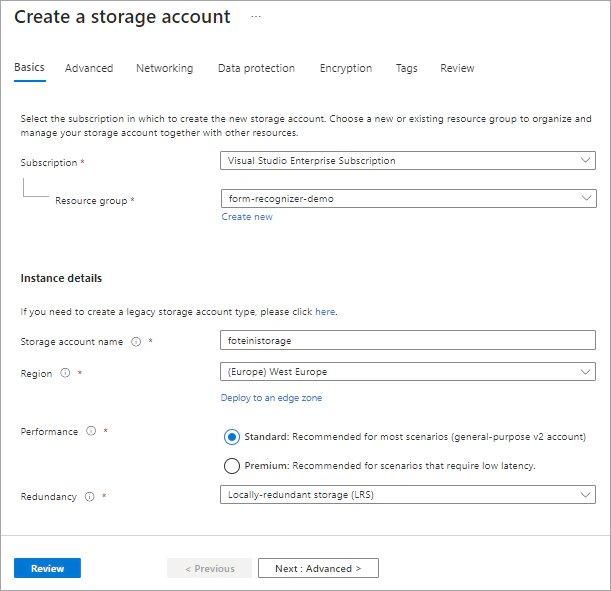
Select Review + Create and then select the Create button and wait for the deployment to complete. Once the deployment is complete, navigate to your storage account.
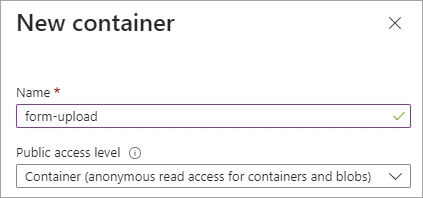
In the left pane, under Data storage, select Containers.
Create a new container. Select a name and set the public access level to Container.
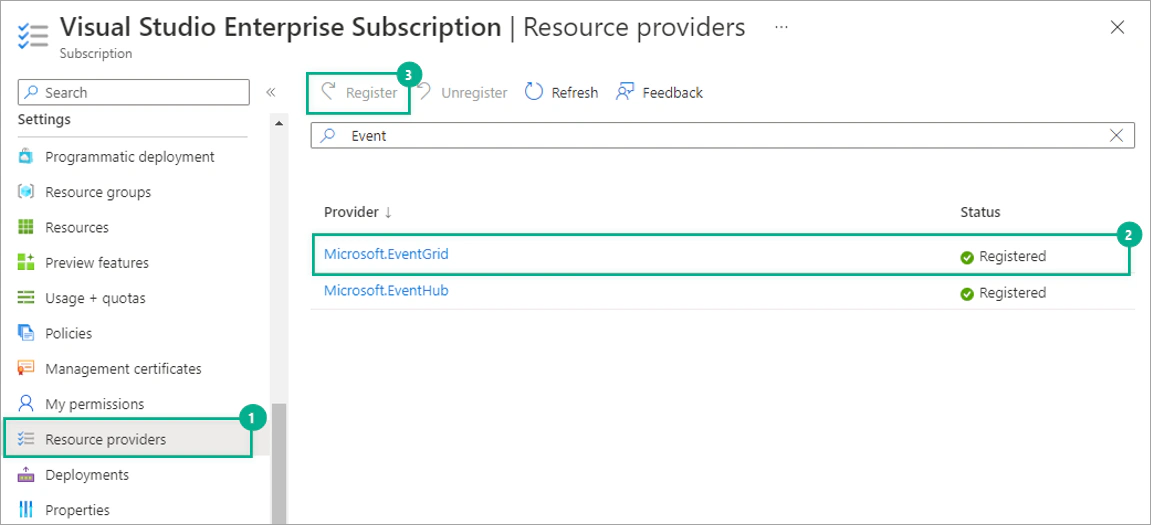
Event Grid is a kind of event broker that you can use to integrate applications using events. We will use Event Grid as a trigger to run the Logic App when a file is uploaded in the Azure Storage container.
To use Event Grid, you must first register it as a resource provider in your subscription.
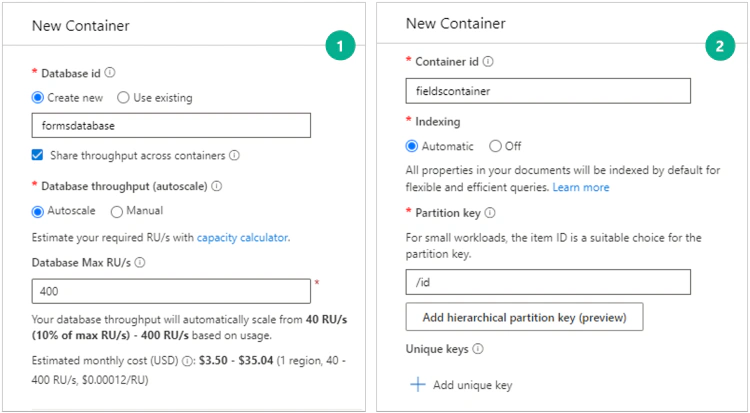
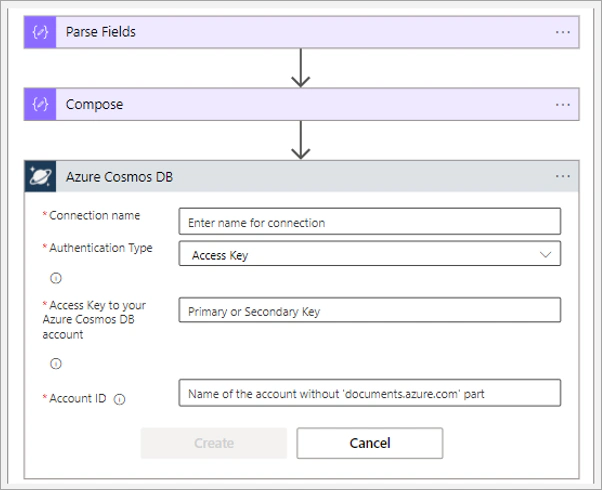
You need to create an Azure Cosmos DB account, database, and container to store the fields extracted from the safety forms.
In the Azure portal, search for Azure Cosmos DB and then click Create.
Create a new Azure Cosmos DB for NoSQL account by selecting the corresponding card in the Which API best suits your workload? window.
Create an Azure Cosmos DB account with the settings below:
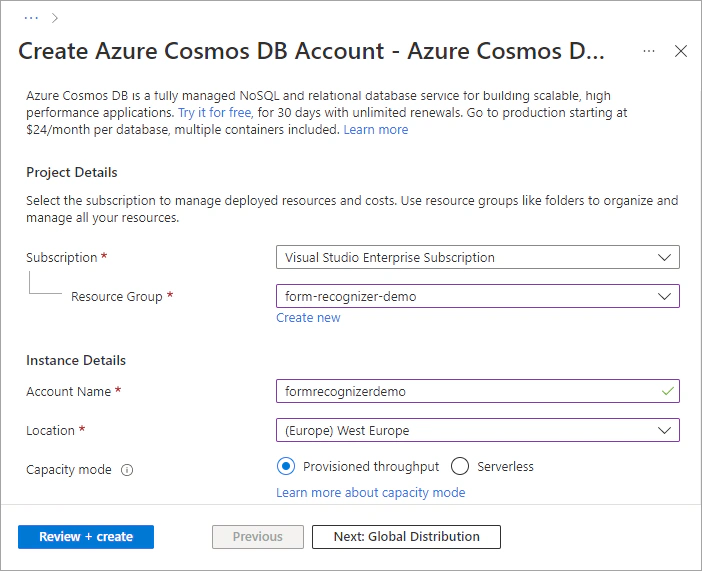
Select Review + Create and then select the Create button and wait for the deployment to complete. Once the deployment is complete, navigate to your resource.
In the left pane, select Data Explorer. Then, create a new database and a container.
The last component that we need to provision is a Logic App.
In the Azure portal, search for Logic apps and then click + Add.
Create a Logic App by specifying the following parameters:
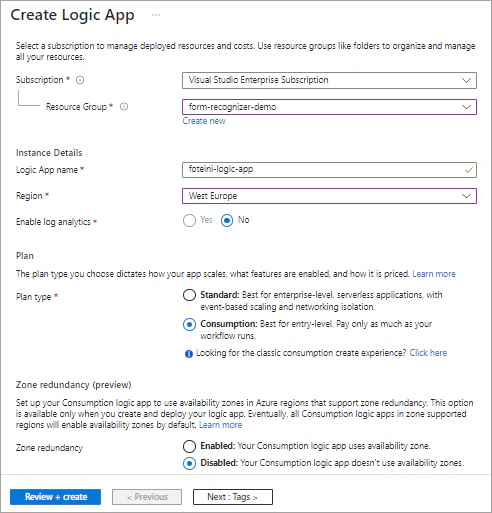
Select Review + Create and then Create.
Once the deployment is complete, navigate to your Logic App resource. You are now ready to build the document processing workflow.
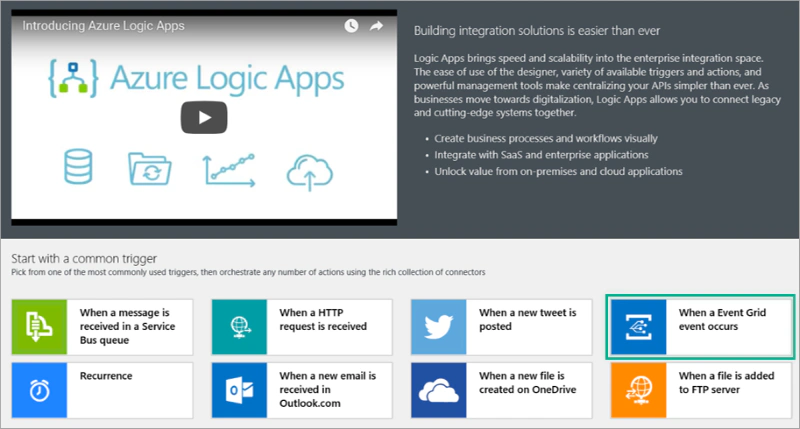
You will build the document processing workflow using the Logic App Designer, a graphical user interface that enables you to create workflows visually.
Once the Logic App resource is created, you will see the starter window of Logic App designer. In the Start with a common trigger window, select the When an Event Grid event occurs block.
Sign in to your account. In the When a resource event occurs block specify the following details:
Microsoft.Storage.StorageAccountsMicrosoft.Storage.BlobCreated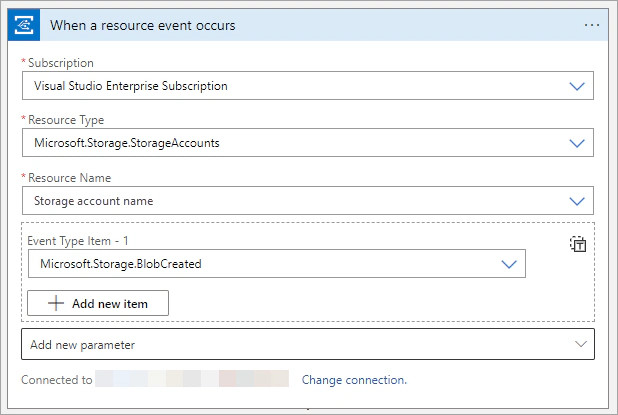
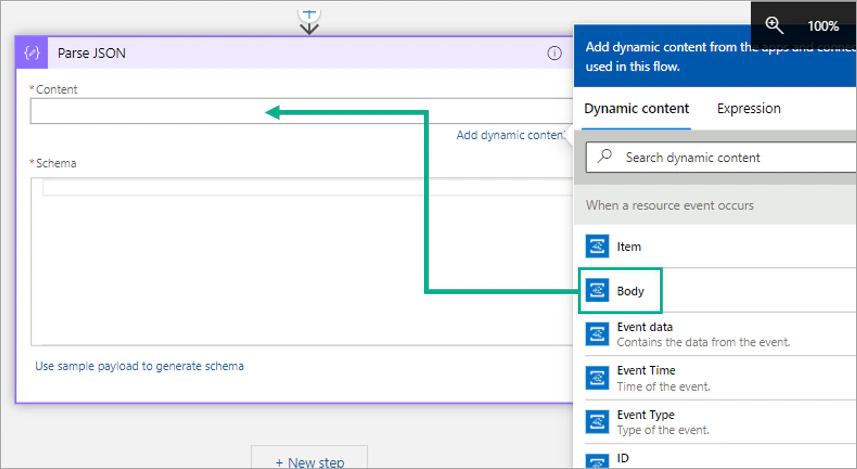
Add a new step. In the Choose an operation window, search for Parse JSON and then select the respective action.
In the Parse JSON block, enter the following parameters:
Body | |
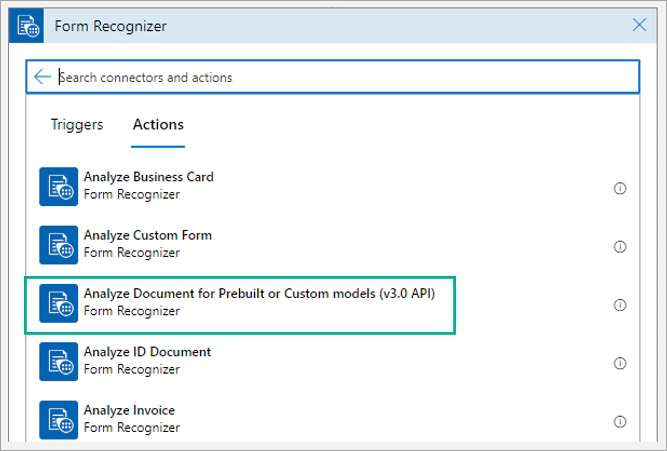
Find the Analyze Document for Prebuilt or Custom models (v3.0 API) in the Form Recognizer connector and add it to your workflow.
Connect to Form Recognizer:
Then, specify the following parameters:
url.
The JSON response of the Analyze Document for Prebuilt or Custom models (v3.0 API) action includes several information, such as the text extracted from the form, layout information, selection marks, and key-value pairs. We are interested in extracting the fields and their associated values. In the following steps, you will build a pipeline that extracts the fields from the JSON response, processes the values, generates a JSON file and saves the file in Azure Cosmos DB.
Add a Parse JSON action and specify the following details:
fields."fields".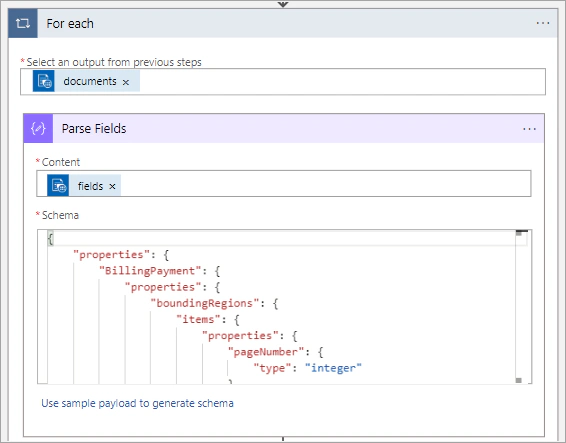
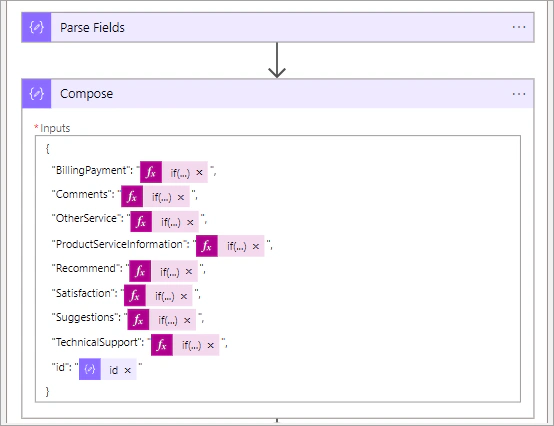
Add a Compose action (inside the For each block). We will save the extracted fields in the following format:
| |
To extract the value associated with each field, use if statements. You can add an if statement by selecting Add dynamic content > Expression.
For example, to extract the values associated with the fields BillingPayment, Comments and Recommend, you can use the below expressions:
| |
| |
| |
In a similar way, you can extract the values corresponding to the remaining fields.
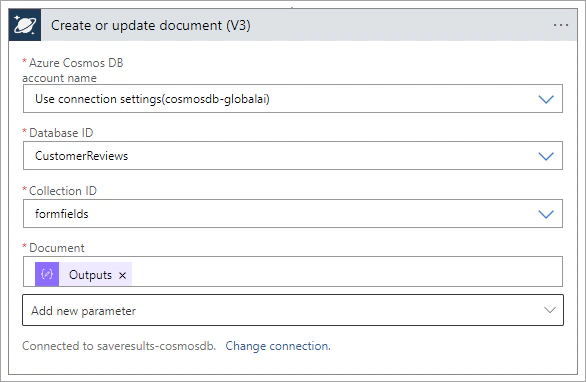
Click Add an action and select the Create or update document (V3) action of the Azure Cosmos DB connector. Then, configure the Azure Cosmos DB connection by specifying the values below:
In the Create or update document (V3) block, specify the ID of your database and collection. Then, under Document, select Add dynamic content and add the block named Outputs.
Save the workflow and then click Run Trigger > Run. Upload a file to your Azure Storage container to test the Logic App.
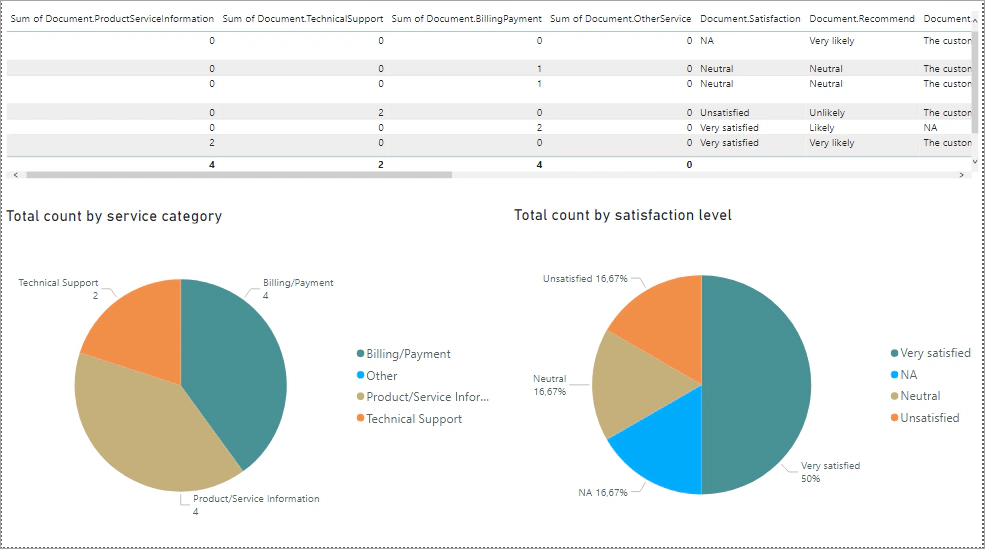
You can use Power BI to visualize the results obtained from the form processing workflow. If you don’t have a Power BI subscription, you can use Power BI Desktop, which is a free service.
Below you can see a simple Power BI dashboard that I created to visualize the extracted data.
In this article, you created an end-to-end automated form processing solution using Form Recognizer, Logic Apps, Azure Cosmos DB and Power BI. You can use this solution to create automated workflows for your specific scenarios. You can also extend this scenario by adding AI capabilities (such as, sentiment analysis, key-phrase extraction, opinion mining) in your Logic App workflow.
Here are some additional scenarios that leverage Azure Form Recognizer:
Learn more about automating document processing with Azure Form Recognizer and Logic Apps:
If you have finished learning, you can delete the resource group from your Azure subscription:

Written By
I am a Back-End Engineer at NET2GRID in Greece, with an integrated Master's degree in Electrical and Computer Engineering from the Aristotle University of Thessaloniki. I am interested in AI, IoT, Wireless Communications, and Cloud Technologies, as well as in applications of technology in healthcare and education. I am also a Microsoft AI MVP.
In this article, you will build a document processing solution using Form Recognizer, Logic Apps, and Azure OpenAI.
The session “Automate Document Processing with Azure Form Recognizer” presented at EMEA Cloud and Modern Workplace Summit 2023.

The session “Automate Document Processing with Azure Form Recognizer” presented at Azure for Sure.
The session “Automate Document Processing with Azure Form Recognizer” presented at Global AI Bootcamp Thessaloniki.