Explore Azure Computer Vision 4.0 (Florence model)

In March 2023, Microsoft announced the integration of the Florence Foundation model into Azure Cognitive Services for Vision. This integration provides developers with access to the latest version of the Azure Computer Vision Image Analysis SDK, which enables them to extract a variety of visual features and text from images, generate captions and tags, train custom models, and build image retrieval systems. To learn more about the new features available with the Florence Foundation model, please read the post Announcing a renaissance in computer vision AI with Microsoft’s Florence foundation model.

Are you curious about how to begin utilizing the new features of Azure Computer Vision? The Image Analysis SDK can be used to generate alt-text descriptions for images on your social media post or website.

In this post, you will explore the latest features of Azure Computer Vision for image analysis and text extraction. You will learn how to:

  • Use the Image Analysis features in the Vision Studio.
  • Build a basic image analysis application using the Image Analysis client library for Python.

Before you begin building your app, take the following steps:

  • Sign up for either an Azure free account or an Azure for Students account. If you already have an active subscription, you can use it.
  • Create a Computer Vision or Cognitive Services resource in the Azure portal. For the Computer Vision resource, you can use the Free pricing tier to try the service.
  • Install Python 3.x and Visual Studio Code.
If you want to try all the services that are available in the Vision Studio, I suggest you create a Cognitive Services resource in the East US region.

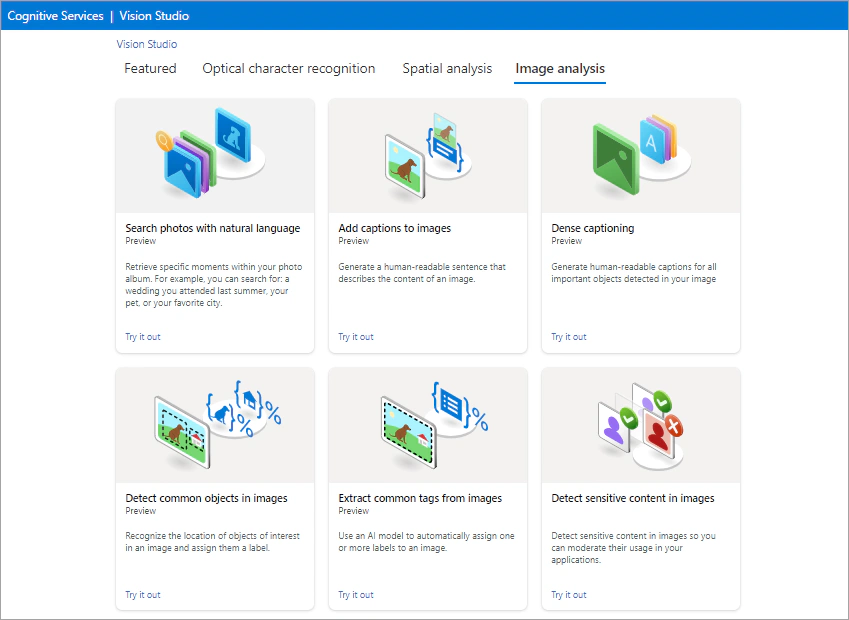
Get started using Vision Studio

  1. Navigate to the Vision Studio website and sign in using your Vision resource.

  2. In the Image Analysis tab, you can find all the available preconfigured features. You can select the tiles Extract common tags from images and Detect common objects in images if you want to create a custom image classification or object detection model, respectively.

    The Image Analysis section in the Vision Studio.
  3. Let’s select the Dense Captions tile, which generates human-readable descriptions for several objects detected in an image.

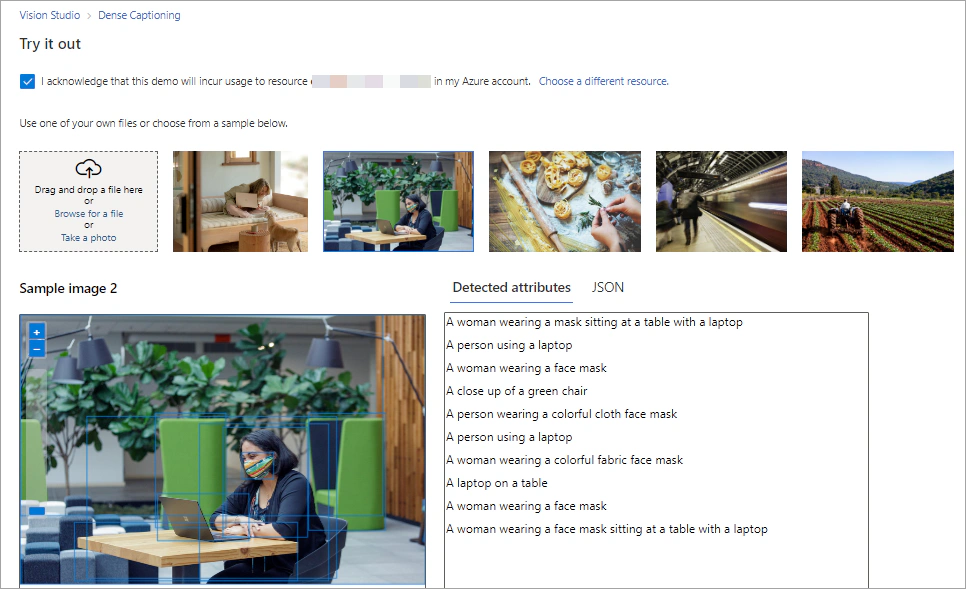
  4. Under Try it out, you can specify the resource that you want to use for the analysis. The Dense Captions feature works with both a Computer Vision and a Cognitive Services resource.

  5. Then, select one of the sample images or upload an image for analysis.

  6. On the right pane, you can see the captions that generated by the service and the JSON output.

    Screenshot of the Dense Captioning feature in Vision Studio and the generated output.

Analyze images using the Python SDK

Using the Image Analysis client SDK for Python, we are going to develop a basic image analysis application. This application will take a local image as input and generate captions and dense captions, tag visual features, and detect objects.

First, install the Azure AI Vision client SDK using the following command:

1
pip install azure-ai-vision

Create environment variables

Create a .env file and set two variables in it: CV_KEY and CV_ENDPOINT. These variables should contain the key and endpoint of your Computer Vision resource, respectively.

Analyze a local image

Create a new python file and open it in Visual Studio Code or your preferred editor.

Want to view the whole code at once? You can find it on GitHub.
  1. Import the following libraries.

    1
    2
    3
    
    import os
    import azure.ai.vision as cvsdk
    from dotenv import load_dotenv
    
  2. Create variables for your Computer Vision resource and authenticate against the service.

    1
    2
    3
    4
    5
    6
    7
    
    # Load environment variables
    load_dotenv()
    endpoint = os.getenv('CV_ENDPOINT')
    key = os.getenv('CV_KEY')
    
    # Create a Vision Service
    service_options = cvsdk.VisionServiceOptions(endpoint, key)
    
  3. Then, select an image to analyze.

    1
    2
    3
    
    # Select an image to analyze
    img_filename = "sample.jpg"
    vision_source = cvsdk.VisionSource(filename=img_filename)
    
    You can also analyze a remote image by passing in the image URL to the VisionSource constructor instead of the local image path: vision_source = sdk.VisionSource(url="<URL>").
  4. The Image Analysis API provides several computer vision operations, such as generating captions for an image, tags for visual features, and thumbnails, detecting objects or people or reading text from images. Create an ImageAnalysisOptions object and specify the visual features you’d like to extract.

     1
     2
     3
     4
     5
     6
     7
     8
     9
    10
    11
    12
    13
    14
    
    # Set image analysis options and features
    analysis_options = cvsdk.ImageAnalysisOptions()
    analysis_options.features = (
        cvsdk.ImageAnalysisFeature.CAPTION |
        cvsdk.ImageAnalysisFeature.DENSE_CAPTIONS |
        cvsdk.ImageAnalysisFeature.TAGS |
        cvsdk.ImageAnalysisFeature.OBJECTS
    )
    
    # Specify the language of the returned data
    analysis_options.language = "en"
    
    # Select gender neutral captions
    analysis_options.gender_neutral_caption = True
    
  5. Use the following code to get the results from the Computer Vision service.

     1
     2
     3
     4
     5
     6
     7
     8
     9
    10
    11
    12
    13
    14
    15
    16
    17
    18
    19
    20
    21
    22
    23
    24
    25
    26
    27
    28
    29
    30
    31
    32
    33
    
    # Get the Image Analysis results
    image_analyzer = cvsdk.ImageAnalyzer(service_options, vision_source, analysis_options)
    result = image_analyzer.analyze()
    
    if result.reason == cvsdk.ImageAnalysisResultReason.ANALYZED:
        # Print caption
        if result.caption is not None:
            print(f"\nCaption: '{result.caption.content}' (Confidence {result.caption.confidence :.4f})")
    
        # Print dense captions
        if result.dense_captions is not None:
            print("\nDense Captions:\n")
            for caption in result.dense_captions:
                print(f" '{caption.content}' (Confidence: {caption.confidence :.4f})")
    
        # Print tags
        if result.tags is not None:
            print("\nTags:\n")
            for tag in result.tags:
                print(f" '{tag.name}' (Confidence {tag.confidence :.4f})")
    
        # Print objects
        if result.objects is not None:
            print("\nObjects:\n")
            for object in result.objects:
                print(f" '{object.name}', {object.bounding_box} (Confidence: {object.confidence :.4f})")
    
    else:
        error_details = cvsdk.ImageAnalysisErrorDetails.from_result(result)
        print("Analysis failed.")
        print(f" Error reason: {error_details.reason}")
        print(f" Error code: {error_details.error_code}")
        print(f" Error message: {error_details.message}")
    
  6. Then run the application and inspect the output.

     1
     2
     3
     4
     5
     6
     7
     8
     9
    10
    11
    12
    13
    14
    15
    16
    17
    18
    19
    20
    21
    22
    23
    24
    25
    26
    27
    28
    29
    30
    31
    32
    33
    34
    35
    36
    37
    38
    
    Caption: 'a person smiling at a machine' (Confidence 0.2436)
    
    Dense Captions:
    
     'a person smiling at a machine' (Confidence: 0.2436)
     'a person smiling at another person' (Confidence: 0.4074)
     'a laptop on a desk' (Confidence: 0.4556)
     'a person in a white shirt' (Confidence: 0.4244)
     'a close up of a machine' (Confidence: 0.4394)
     'a close up of a speaker' (Confidence: 0.5818)
     'a person holding a toothbrush' (Confidence: 0.3834)
     'a close-up of a person's arm' (Confidence: 0.5754)
     'a close-up of a machine' (Confidence: 0.4533)
     'a person smiling with her hair in a ponytail' (Confidence: 0.4330)
    
    Tags:
    
     'indoor' (Confidence 0.9880)
     'person' (Confidence 0.9863)
     'clothing' (Confidence 0.9816)
     'laptop' (Confidence 0.9524)
     'desk' (Confidence 0.9416)
     'wall' (Confidence 0.9399)
     'job' (Confidence 0.9313)
     'office building' (Confidence 0.9212)
     'personal computer' (Confidence 0.9096)
     'computer' (Confidence 0.8871)
     'woman' (Confidence 0.8750)
     'table' (Confidence 0.8719)
     'medical equipment' (Confidence 0.8450)
     'microscope' (Confidence 0.5980)
     'lab' (Confidence 0.4214)
    
    Objects:
    
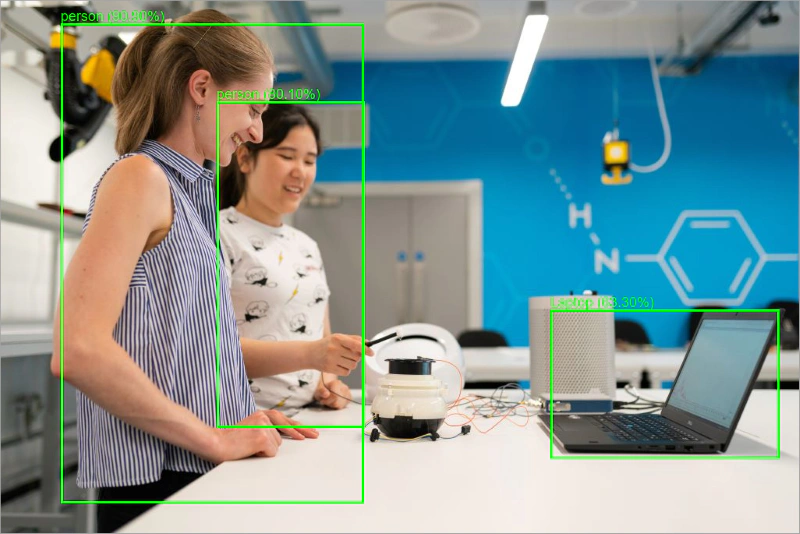
     'person', Rectangle(x=277, y=129, w=189, h=418) (Confidence: 0.8010)
     'Laptop', Rectangle(x=705, y=396, w=293, h=191) (Confidence: 0.6330)
     'person', Rectangle(x=77, y=29, w=388, h=615) (Confidence: 0.9090)
    

You can also extend this basic application to display the predicted probabilities and a bounding box around every detected object. The following code uses the Python Imaging Library (Pillow) to open the local image and display a rectangle around the detected objects along with the name of the object and the confidence score.

 1
 2
 3
 4
 5
 6
 7
 8
 9
10
11
12
13
14
15
16
17
18
19
20
21
22
23
24
25
26
27
28
29
30
31
32
33
34
35
36
37
38
39
40
41
42
43
44
45
46
47
48
49
50
51
52
53
54
55
56
57
58
59
60
61
62
63
64
65
66
67
68
69
70
71
72
73
74
75
76
77
78
79
80
81
82
83
84
85
86
87
88
89
90
91
92
93
94
import os
import azure.ai.vision as cvsdk
from dotenv import load_dotenv
from PIL import Image, ImageDraw, ImageFont
import numpy as np

# Load environment variables
load_dotenv()
endpoint = os.getenv('CV_ENDPOINT')
key = os.getenv('CV_KEY')

# Create a Vision Service
service_options = cvsdk.VisionServiceOptions(endpoint, key)

# Select an image to analyze
img_filename = "sample.jpg"
vision_source = cvsdk.VisionSource(filename=img_filename)

# Set image analysis options and features
analysis_options = cvsdk.ImageAnalysisOptions()
analysis_options.features = (
    cvsdk.ImageAnalysisFeature.CAPTION |
    cvsdk.ImageAnalysisFeature.DENSE_CAPTIONS |
    cvsdk.ImageAnalysisFeature.TAGS |
    cvsdk.ImageAnalysisFeature.OBJECTS
)

# Specify the language of the returned data
analysis_options.language = "en"

# Select gender neutral captions
analysis_options.gender_neutral_caption = True

# Get the Image Analysis results
image_analyzer = cvsdk.ImageAnalyzer(service_options, vision_source, analysis_options)
result = image_analyzer.analyze()

if result.reason == cvsdk.ImageAnalysisResultReason.ANALYZED:
    # Print caption
    if result.caption is not None:
        print(f"\nCaption: '{result.caption.content}' (Confidence {result.caption.confidence :.4f})")

    # Print dense captions
    if result.dense_captions is not None:
        print("\nDense Captions:\n")
        for caption in result.dense_captions:
            print(f" '{caption.content}' (Confidence: {caption.confidence :.4f})")

    # Print tags
    if result.tags is not None:
        print("\nTags:\n")
        for tag in result.tags:
            print(f" '{tag.name}' (Confidence {tag.confidence :.4f})")

    # Print objects
    if result.objects is not None:
        # Load a test image and get its dimensions
        img = Image.open(img_filename)
        img_height, img_width, img_ch = np.array(img).shape

        # Display the image
        draw = ImageDraw.Draw(img)

        # Select line width and color for the bounding box
        line_width = 3
        font_size = 18
        color = (0,255,0)

        print("\nObjects:\n")
        for object in result.objects:
            print(f" '{object.name}', {object.bounding_box} (Confidence: {object.confidence :.4f})")

            if object.confidence > 0.5:
                left = object.bounding_box.x
                top = object.bounding_box.y
                height = object.bounding_box.h
                width =  object.bounding_box.w
                # Create a rectangle
                shape = [(left, top), (left+width, top+height)]
                draw.rectangle(shape, outline=color, width=line_width)
                # Display probabilities
                font = ImageFont.truetype("arial.ttf", font_size)
                draw.text((left, top-20), f"{object.name} ({object.confidence * 100 :.2f}%)", fill=color, font=font)

        img.show()
        img.save("result.png", "PNG")
        print("Image saved!")

else:
    error_details = cvsdk.ImageAnalysisErrorDetails.from_result(result)
    print("Analysis failed.")
    print(f" Error reason: {error_details.reason}")
    print(f" Error code: {error_details.error_code}")
    print(f" Error message: {error_details.message}")

The output of the application will look as follows.

An image with bounding boxes around three objects detected by the Image Analysis API.
Image source: Unsplash

Summary and next steps

In this post, I showed you how to use the latest features of the Azure Computer Vision Image Analysis API. This simple app that we’ve built shows only some of the capabilities of the Computer Vision service. You can find more information about what you can do with the service on the Computer Vision Documentation on Microsoft Docs.

You May Also Like